
Of May beginneth
2nd May 2021
A brief instalment only, this week.
I'm late writing this tonight and not sensing much inspiration. It has been a quiet week as I have been trying to catch up on paperwork - year end, month end, VAT, design, ordering, chasing up overdue stuff - "we don't have any record of an order from you... ... oh Accounts never told us your BACS had been received...." - you know what it's like.
On Tuesday Andrew was tearing his hair out over work issues and asked me to pop up to Barnsley and collect some bits from that same auction house that managed to lose our sack truck last time. Fortunately all appeared in order (though a box of Whitworth spanners, that seemed quite big in the auction lot photo, turned out to have been rather smaller in real life) but as it was two other lots of miscellania- drive belts, bearings, filters and so forth - you wouldn't know if the odd item was missing anyway. For all I regret the passing of the Sheffield auction house Ellis Willis & Becket (we had quite a bit through them) all too often you'd inspect a lot, bid on it, and when you came to collect, there would be a few less left than when you inspected. Some prospective purchasers must have left with fuller pockets.
So apart from that excursion, and another to collect a load of brake blocks from the machinists, up until Friday I hadn't been out far and for once the trailer had had a rest. But Friday was spent down at the workshops, with the Alstom loco on my radar, having ripped out all the wiring in the desk area, it was time to start building it back up again, only better.
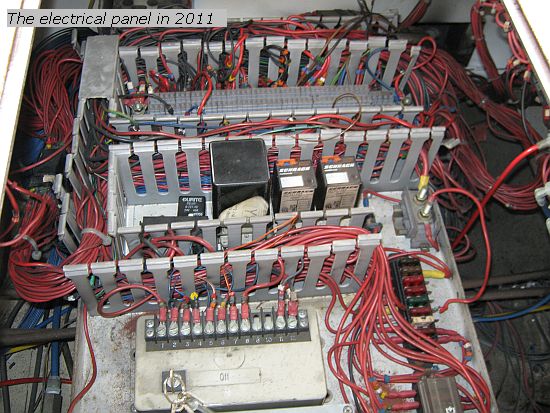
This was what tbe wiring looked like back in 2011, ten years after I'd finished it and clearly someone had been in fault-finding or mucking around and not putting covers back. The trouble is, at the back there is a row of conventional electrical terminals. Some of these are junctioned, so one wire at one side, two at the other, some are double-stacked, so 2 wires at each level. But when you want to check something through, locating the precise wire number you want is another thing altogether. You needed a chart to tell you where it ought to be, and the ability to count along without interruption and without your eyes becoming confused by parallax. In those days too the PLC I was using was limited on the switching currents so a number of relays were needed to handle the valves, solenoids etc on the loco. Although I drew up the drawings, I didn't actually wire this loco, I had electricians for that, but did I direct them properly? The workshops were over a hundred miles from my office in those days, telephone and fax were our regular means of communication, plus me tripping down mid-week and on Saturdays to view progress and try to keep on top of the work.
In more recent years I've come back to a traditional method of connecting wires, namely a brass screw sticking up from an insulated base, and every wire crimped and every crimp nutted thereto. Takes more space up than a row of electrical terminals, but it's easier to trace through, takes any number of crimps per bolt (well not any number, as a commoning post reveals) and is more reliable than trying to stuff bared copper conductors into a small aperture and hope to clamp all of them firmly at the same time with a screw. The trick is to lay out enough bolts with enough space around them for the wires in number and volume. You always seem to need more than you expected (so I count up as I prepare the schematic and add at least 25% for the unforeseens) and never enough space to get all the wires in and around.
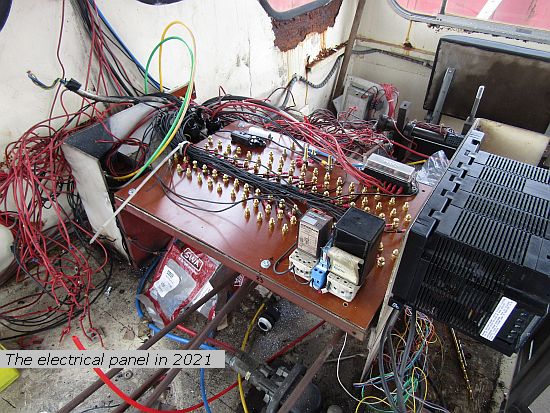
Here's a preview of my latest effort - that's the same steel base as in the picture above - but I call it a preview as so far it has perhaps 20% of the cables it will need and already that central spline, where they all line up before breaking left and right to their respective bolts, is looking a bit bulky. I have some space in reserve over on the left (though to be honest, if I need to add more bolts there it will be a stressful undertaking) which I allocated to encompass some items that I have managed to squeeze in elsewhere. In the final installation, incidentally, this whole panel pivots so as to enable access to the valves and linkages underneath, so all cables have to come in over that far end with sufficient give to permit this. The jumble of wiring over at the left is the (stripped out) connections to the instrument panels. These were left as loose bundles which plugged in to the panels themselves. There were 3, as each driving position had the essential levers of throttle, loco brake alone and loco and train brake together, but then the instruments needed for driving - the air gauges, speedo and tacho, plus the direction and clutch and other functions like sanders were to be found on the panel immediately in front. A third panel 'up top' on the desk carried things like the light control switches.
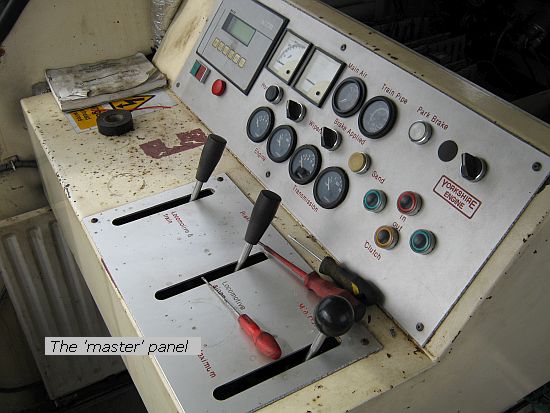
One of the two side panels was designated 'master' and also had the engine start/stop, alternator warning light, diagnostics panel, etc., and in theory you could swap this from one side to the other by unplugging the cable (and 3 small air connections), unscrewing it from the desk and moving it to the opposite side. The plugs in the desk had common pin-outs so that they were the same to facilitate this. But there was too much left loose in the way of cables within the desk. Had we built more, I might have refined how we did it and who knows, maybe a whole new set of ideas would have presented themselves.
A week or so ago there was a photograph of a Permaquip trolley I had acquired for handling a traction motor, and one of my correspondents sent me a photo of a BR example for comparison. Yorkshire Engine - the original Meadowhall one that is - had their own ideas, with a 4-wheeled trolley with larger wheels and in the centre a cradle on a jacking thread so that you could roll it under a traction motor and take its weight before knocking out the suspension pin. It had the appearance of being an outline drawing that YEC never detailed and perhaps a bit too 'specific' for us.
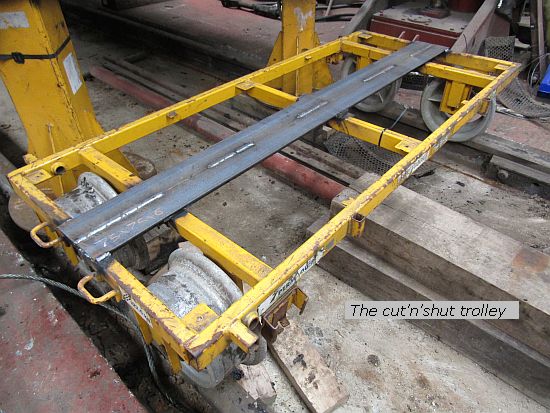
Anyway, this weekend the trolley has finally been cut-n-shut to render it lighter and more manouverable ready for another traction motor to emerge.
And that I'm afraid is about it for tonight. I should be back next week, see ya then.